
Want to give your place a fresh look and show off your personality? Making your own diy chandelier ideas can be a fun way to do just that. These projects aren't just about crafting; they're about adding a special touch to your home. Whether you like a cozy, rustic feel or something super modern, there’s a project here for you. Let's check out some cool ideas that will brighten up your space and maybe even get your friends talking!
Key Takeaways
- DIY chandeliers can be made from all sorts of materials, like old jars, pipes, or even beads.
- You can really make your chandelier your own by picking colors and styles that fit your home.
- Always be careful with electricity; make sure everything is wired correctly and safely.
- Using recycled stuff for your chandelier can save you money and give it a unique vibe.
- Don't be scared to try out different shapes and designs to make a chandelier that really stands out.
Charming Mason Jar DIY Chandelier Ideas
Mason jar chandeliers? I know, it sounds a little out there, but trust me, they can look amazing! I've been seeing these all over the place and finally decided to give it a shot. It's way simpler than you might think, and the end result is a super cozy, rustic feel that I'm totally digging. Plus, you can tweak it to really fit your space, which is always a win. If you are looking for DIY Projects, this is a great one to try.
Creating a Cozy Atmosphere
Okay, so the whole point of a mason jar chandelier is to make your space feel warm and inviting. Think about the kind of light you want. Do you want it bright and functional, or more of a soft, ambient glow? I went for the latter. Using warm-toned bulbs is key here. It instantly makes the room feel more relaxed. You can also play around with the placement of the jars to control how the light is distributed. I staggered mine a bit to create some interesting shadows.
- Use warm-toned bulbs for a cozy glow.
- Stagger jar placement for interesting shadows.
- Consider a dimmer switch to adjust the ambiance.
The right lighting can completely transform a room. It's not just about seeing; it's about feeling. A mason jar chandelier, done right, can make any space feel like a warm hug.
Selecting the Right Jars
Not all mason jars are created equal, people! Think about the size, shape, and color. Do you want all the jars to match, or do you want a more eclectic look? I went with a mix of clear and slightly frosted jars for some variety. You can even use different sizes for a more dynamic look. Also, consider the garden lighting you will use. Here's a quick guide:
| Jar Type | Characteristics |
|---|---|
| Clear | Bright, direct light |
| Frosted | Soft, diffused light |
| Colored | Adds a tint to the light |
| Vintage Style | Unique shapes and embossed designs |
Wiring for Warmth
Okay, this is where things get a little technical, but don't freak out! If you're not comfortable with electrical work, definitely get a pro to help you out. Safety first, always! But if you're feeling brave, make sure you turn off the power at the breaker before you start. Use proper wiring connectors and make sure everything is grounded correctly. You can find tons of tutorials online, but seriously, if you're unsure, call an electrician. You can also find traditional styles of chandeliers if you don't want to do it yourself.
- Turn off the power at the breaker.
- Use proper wiring connectors.
- Ground everything correctly.
Industrial Pipe DIY Chandelier Ideas
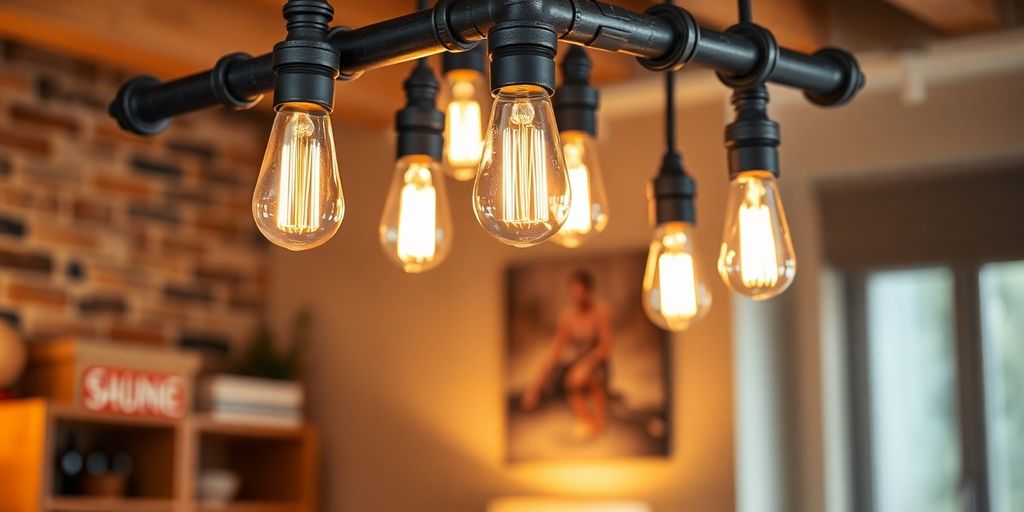
Sleek Industrial Look
So, you're thinking about an industrial pipe chandelier? Nice choice! It's a cool way to add some edge to your place. The industrial style is all about raw materials and a no-nonsense vibe. Think exposed brick, metal accents, and a generally unfinished feel. It's not about being perfect; it's about being real. This kind of chandelier can be a real statement piece, especially in a dining room or living area. It brings a bit of that factory-chic aesthetic right into your home.
Choosing Your Pipes
Okay, let's talk pipes. You've got a few options here, but black iron pipes are the go-to for that classic industrial look. Galvanized steel is another choice, it's a bit shinier and more resistant to rust. You'll need to figure out what lengths you need based on your design. Here's a quick rundown:
- Black Iron: The classic choice, gives a raw, matte finish.
- Galvanized Steel: More rust-resistant, shinier appearance.
- Copper: A pricier option, but adds a touch of warmth and elegance.
When picking your pipes, think about the overall size of the room and how big you want the chandelier to be. Too big, and it'll overwhelm the space. Too small, and it'll get lost. Measure twice, cut once, as they say!
Assembling Your Fixture
Alright, time to put it all together. First, lay out all your pipes and fittings according to your design. Make sure everything lines up the way you want it. You'll need some pipe wrenches to tighten the fittings securely. Don't overtighten, or you risk damaging the threads. When it comes to wiring, make sure you turn off the power first! If you're not comfortable with electrical work, it's always best to call a professional electrician. Safety first, always. Here are some steps to follow:
- Layout your design on the floor.
- Connect the pipes and fittings, tightening securely.
- Wire the sockets, following electrical safety guidelines.
Elegant Wooden Bead DIY Chandelier Ideas
Beaded chandeliers can really bring a touch of class and sophistication to any room. They're also surprisingly easy to make yourself, and you can totally customize them to match your existing decor. I love how versatile they are – you can go super fancy with crystals or keep it casual with wooden beads. It's all about what you like!
Crafting with Beads
The type of beads you choose will dramatically impact the overall look of your chandelier. Consider these options:
- Crystal Beads: These add sparkle and elegance. They're great for formal dining rooms or bedrooms.
- Wooden Beads: For a more rustic or bohemian vibe, wooden beads are perfect. You can paint or stain them to match your color scheme. You can find great DIY Projects online.
- Glass Beads: Available in a wide range of colors and shapes, glass beads offer endless possibilities for customization. Think about using different sizes for a more interesting look.
- Acrylic Beads: A budget-friendly option that still provides a good amount of shine and color. They're lightweight, too, which is a bonus.
Designing Your Pattern
Before you start stringing beads, it's a good idea to plan out your design. Here are a few things to consider:
- Symmetry: Do you want a symmetrical design, or something more free-flowing? Symmetrical designs are easier to execute, but asymmetrical designs can be more visually interesting.
- Length: How long do you want your chandelier to be? Consider the height of your ceiling and the size of your room. You can browse for living room lights to complement your new creation!
- Color: Choose a color that complements your beads and the rest of your decor. Metallic colors like gold or silver can add a touch of glamour, while neutral colors like white or black can create a more understated look.
Don't be afraid to experiment with different painting techniques, like distressing or antiquing, to add character to your chandelier. You can also use stencils to create patterns or designs on the frame.
Stringing and Securing
Once you have your beads and your design, it's time to start stringing! Here are a few tips to keep in mind:
- Use a strong string: You don't want your chandelier to fall apart! Use a strong, durable string like fishing line or beading wire.
- Knot securely: Make sure your knots are tight and secure. You can even add a drop of glue to the knot for extra security.
- Leave enough space: Leave enough space between the beads so that they can move freely. This will help to create a more dynamic and interesting look. Consider using a dimmer switch to control the light intensity and create different moods.
With a little creativity and some basic supplies, you can create a stunning beaded chandelier that will transform your space. It's a fun project that adds a personal touch to your home.
Upcycled Bottle DIY Chandelier Ideas
Collecting Bottles
Alright, so the first thing you need is, well, bottles! But don't just grab any random bottle. Think about the vibe you're going for. Do you want them all the same color for a uniform look, or a mix of different colors for something more interesting? I started saving wine bottles a while back, but you could also ask friends, family, or even local restaurants to donate their empties. Just make sure you clean them really well. Nobody wants a sticky chandelier! Also, think about the shapes. Different shapes can add a lot of visual interest. I even found some cool antique-looking bottles at a flea market that I'm excited to use. Remember to remove all the labels. Soaking them in warm, soapy water usually works, but sometimes you need a little extra help. This is a great way to contribute to eco-friendly homes.
Designing the Chandelier
This is where it gets fun! Think about the overall design. Are you going for a simple, single-tier chandelier, or something more elaborate with multiple levels? I sketched out a few different ideas before settling on one. You'll need to figure out how you're going to hang the bottles. There are a few options here. You can use metal rings, wire, or even rope. The method you choose will depend on the weight of the bottles and the look you're going for. I'm planning on using a metal frame that I found at a garage sale and then suspending the bottles from it with wire. Make sure everything is balanced, or you'll end up with a lopsided chandelier. Safety first! Also, think about the wiring. How are you going to run the wires to each bottle? You'll need to drill holes in the bottles, so be careful! Use a diamond-tipped drill bit and go slowly.
Preparing Bottles for Lighting
Alright, time to put it all together. Before you start, make sure you have all your electrical components: light sockets, wire, wire strippers, and wire connectors. If you're not comfortable working with electricity, please, please, please hire an electrician. It's not worth risking your safety. Carefully thread the wires through the bottles and connect them to the light sockets. Then, mount the chandelier to the ceiling. Make sure it's securely attached to a ceiling joist. You don't want it falling down! Once it's up, screw in the light bulbs and flip the switch. And there you have it: a beautiful, upcycled bottle chandelier!
This project is a great way to add a unique touch to your home while also being environmentally conscious. Plus, it's a fun conversation starter. Just be prepared for everyone to ask you where you got it!
Here are some things to keep in mind:
- Bottle Security: Ensure each bottle is securely fastened to the frame to prevent accidents.
- Weight Distribution: Distribute the weight evenly to avoid strain on the ceiling mount.
- Electrical Safety: Double-check all wiring connections and use appropriate safety measures.
Modern Geometric DIY Chandelier Ideas
Bold Shapes and Lines
Modern geometric chandeliers are all about making a statement. Forget those traditional curves; we're talking sharp angles, clean lines, and bold shapes. Think about using shapes like triangles, hexagons, or even more complex polyhedra. The key is to create something visually striking that catches the eye. This style is perfect for adding a contemporary touch to any room. It's a chance to move away from the ordinary and embrace something truly unique.
Material Selection for Modernity
Choosing the right materials is important for achieving that modern look. Metal is a great choice – consider sleek steel, brushed nickel, or even painted iron. These materials offer a clean and industrial feel. Acrylic is another option, especially if you want to play with light and transparency. Wood can also work, but keep the lines simple and the finish smooth. Don't be afraid to mix and match materials to create a more interesting design. For example, a metal frame with acrylic accents can look amazing.
Incorporating LED Lights
LEDs are the way to go when it comes to lighting your modern geometric chandelier. They're energy-efficient, long-lasting, and come in a wide range of colors and brightness levels. You can use LED strip lights to highlight the frame itself, or individual LED bulbs for a more traditional chandelier look with a modern twist. Make sure you plan your wiring carefully and use the right connectors. Also, consider using a dimmer switch to control the light intensity and create different moods. Here are some things to consider:
- Brightness: How much light do you need in the space?
- Color Temperature: Do you want warm, cool, or neutral lighting?
- Placement: Where will the lights be positioned to maximize their effect?
Modern geometric chandeliers are all about clean lines, bold shapes, and innovative materials. Don't be afraid to experiment and create something truly unique. It's a chance to add a real statement piece to your home. You can find inspiration from other DIY projects online.
Rustic Twine and Rope DIY Chandelier Ideas
Embracing Natural Textures
Okay, so you're thinking about bringing some of that cozy, outdoorsy feel into your home? A twine or rope chandelier is a fantastic way to do it. It's all about celebrating those raw, natural elements. Think about the kind of vibe you want. Are you leaning towards a nautical theme, or something more like a farmhouse chic? The type of rope or twine you choose will make a big difference. Thick, chunky rope gives off a bolder, more rugged feel, while thinner twine can be more delicate and refined. You can even mix and match different textures for a really unique look. Don't be afraid to get your hands dirty and really play around with the materials. It's all about finding that perfect balance that speaks to your personal style. Consider using Edison bulbs to complete the look.
Wrapping Techniques
This is where the magic happens! There are tons of different ways you can wrap twine or rope to create different effects. A simple, tight wrap can give you a clean, uniform look. Or, you can try a looser, more textured wrap for something a little more rustic. Experiment with different knots and patterns to add visual interest. You could even incorporate other elements like beads or small pieces of driftwood into your wrapping. Here are a few ideas to get you started:
- The Simple Wrap: Just wrap the twine or rope tightly around a frame, overlapping each layer slightly.
- The Knotted Wrap: Add knots at regular intervals for a more textured look.
- The Braided Wrap: Braid the twine or rope before wrapping it around the frame.
Remember to secure your wraps tightly with glue or wire to prevent them from unraveling. A little extra reinforcement can go a long way in ensuring your chandelier lasts.
Adding Edison Bulbs
To really nail that rustic vibe, Edison bulbs are a must. These bulbs have a warm, inviting glow and a vintage-inspired look that perfectly complements the natural textures of twine and rope. They come in all sorts of shapes and sizes, so you can find the perfect ones to fit your design. Just make sure you choose bulbs with the correct wattage for your fixture. Also, consider using a dimmer switch so you can adjust the light intensity and create different moods. Here's a quick guide to different bulb types:
| Bulb Type | Characteristics |
|---|---|
| Edison | Vintage style, warm glow |
| LED | Energy-efficient, long-lasting |
| Incandescent | Traditional, bright light |
Creative Embroidery Hoop DIY Chandelier Ideas
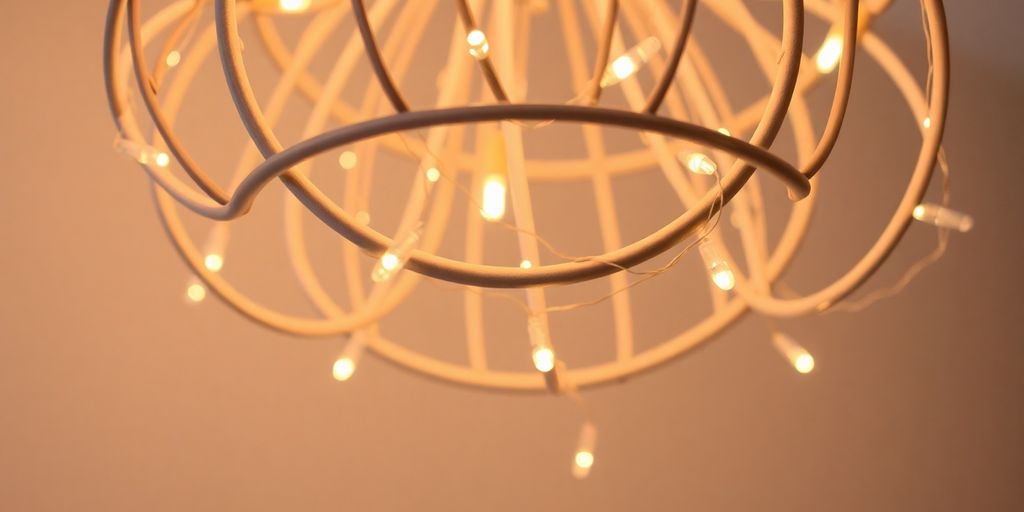
Layering Hoops for Dimension
Embroidery hoops aren't just for needlework anymore! They can be transformed into stunning, dimensional chandeliers. The key is layering different sized hoops to create depth and visual interest. Start by gathering a variety of wooden or plastic embroidery hoops. Think about the overall size and shape you want for your chandelier. You can find hoops at most craft stores, or even thrift stores for a more budget-friendly option. Consider painting the hoops to match your decor or leaving them natural for a rustic look.
- Choose hoops in varying sizes for a tiered effect.
- Experiment with overlapping hoops to create unique shapes.
- Consider using metal hoops for an industrial touch.
When layering, think about how the light will filter through the hoops. Leaving some areas open will create interesting shadows and patterns on your walls and ceiling.
Fabric and Embellishment Choices
This is where your creativity can really shine! The fabric you choose will dramatically impact the overall look of your chandelier. Burlap can give a rustic feel, while silk or satin adds elegance. You can stretch fabric tautly across the hoops, or gather it for a softer, more romantic look. Don't be afraid to add embellishments like beads, lace, or even dried flowers. Think about the color palette of your room and choose fabrics and embellishments that complement it. You can even incorporate unique fabrics to match your style.
- Consider using different textures of fabric for added interest.
- Experiment with dyeing or painting fabric to create custom colors.
- Use hot glue or fabric adhesive to secure fabric and embellishments to the hoops.
Illuminating Your Design
Choosing the right lighting is crucial for your embroidery hoop chandelier. String lights are a popular option, as they are easy to weave through the hoops. You can also use a pendant light kit, suspending a single bulb in the center of the chandelier. Consider using LED bulbs, as they are energy-efficient and produce less heat. Think about the color temperature of the bulbs – warm white will create a cozy atmosphere, while cool white is better for task lighting. Make sure to safely secure all wiring and connections. Here's a quick guide:
| Light Source | Pros | Cons |
|---|---|---|
| String Lights | Easy to install, versatile | Can be difficult to hide wiring |
| Pendant Light | Creates a focal point, brighter light | Requires more careful installation |
| LED Bulbs | Energy-efficient, long-lasting | Can be more expensive than traditional bulbs |
Your DIY Journey Awaits
So there you have it! A bunch of fun DIY chandelier ideas that can really change up your space. Whether you’re going for something rustic with mason jars or a sleek industrial look with pipes, there’s a project here for everyone. Don’t stress if things don’t turn out perfect on the first try—just enjoy the process and make it your own. Remember, it’s all about adding a personal touch to your home. So grab your tools, get creative, and let your imagination shine. Happy crafting!
Frequently Asked Questions
What stuff do I need to make a DIY chandelier?
For your DIY chandelier, you'll likely need things like wood pieces, metal pipes, decorative beads, and light parts. Don't forget basic tools like a drill and safety gear to keep yourself safe.
How can I make sure my chandelier is safe?
Always follow the rules for working with electricity. If you're not sure about something, it's best to ask a professional electrician for help.
Can I change how my chandelier looks?
Yes, totally! You can pick out colors, shapes, and materials that perfectly match the look and feel of your home. Make it truly yours!
Where can I get materials for my chandelier project?
You can find materials at craft stores, hardware stores, or even by reusing things you already have around the house. Look for hidden treasures!
How do I hang my chandelier so it stays up?
Make sure to use strong hangers and hooks that can hold the weight of your chandelier. If you're not sure, it's always a good idea to get help from a pro.
Can I use LED lights in my homemade chandelier?
Yep, using LED lights is a super smart idea! They save energy and come in tons of different styles and colors, so you have lots of choices.


