
When the sun goes down, your yard doesn't have to disappear into darkness. With some smart low voltage lights for garden, you can turn your outdoor space into a welcoming spot. It's not as tricky as it sounds, and it can make a big difference in how you use your yard after dark. This guide will help you figure out the basics, pick the right stuff, and get it all set up.
Key Takeaways
- Low voltage lights use less power than regular lights, making them safer and cheaper to run.
- Planning where your lights will go is important for both looks and safety.
- Different kinds of lights, like path lights and spotlights, do different jobs in your garden.
- You'll need a transformer and special cable to set up a low voltage system.
- Installing these lights can be a DIY project if you follow the steps carefully.
Understanding Low Voltage Lights for Garden Ambiance

Why Choose Low Voltage Systems
When the sun dips below the horizon, your garden doesn't have to disappear into darkness. Instead, it can become a magical extension of your home with low voltage landscape lighting. Many people think setting up outdoor lights means complicated electrical work, but that's where low voltage systems really shine. They operate on a much lower electrical current, typically 12 or 24 volts, compared to the 120 volts used in your house. This makes them significantly safer and much easier for a DIYer to handle.
The biggest draw for many homeowners is the combination of safety and simplicity. You don't need to be an electrician to get a beautiful, functional lighting setup in your yard. Plus, these systems are incredibly energy efficient, especially when you use LED bulbs. This means you can enjoy your illuminated garden without worrying about a huge spike in your electricity bill. It’s a smart way to add both beauty and practicality to your outdoor space.
The Benefits of Low Voltage Lighting
So, why exactly are low voltage systems such a popular choice for garden lighting? For starters, they're incredibly safe. Because the voltage is so low, the risk of electric shock is minimal, which is a huge plus if you have kids or pets running around the yard. You can even bury the cables shallowly without the same level of concern you'd have with high-voltage wiring. This ease of installation is a major selling point.
Here are some key advantages:
- Energy Savings: Low voltage lights, particularly LEDs, use a fraction of the power of traditional bulbs. This translates to lower energy bills and a smaller environmental footprint.
- Cost-Effective: While the initial purchase might seem like an investment, the long-term savings on energy and bulb replacement are substantial. LEDs can last for years.
- Versatility: You can power a wide range of fixtures, from subtle path lights to dramatic uplights, allowing for creative design possibilities.
- Ease of Expansion: Adding more lights later on is generally straightforward, as long as your transformer can handle the extra load.
Low voltage lighting offers a practical and attractive solution for enhancing outdoor spaces, providing safety, ambiance, and energy efficiency without the complexities of high-voltage systems. It's a project that many homeowners can tackle themselves.
What is Low-Voltage Landscape Lighting?
At its core, low-voltage landscape lighting is a system that uses a transformer to step down the standard household voltage (120V) to a much lower voltage (12V or 24V) before it reaches your lights. This transformer is usually plugged into a standard outdoor GFCI-protected outlet. The lower voltage current then travels through special low-voltage cable, which is much thinner and more flexible than standard electrical wire. This cable connects to various light fixtures placed strategically around your garden, pathways, or patio.
Think of it like this: the transformer is the gatekeeper, reducing the power to a safe and manageable level. The cable is the highway, carrying that safe power to the destinations (your lights). The fixtures themselves are designed to work with this lower voltage, often using energy-efficient LED bulbs. This setup makes it possible to illuminate your garden effectively without the need for buried conduits or professional electricians for most installations. It's a system designed for accessibility and beautiful results, allowing you to create a welcoming entryway or highlight garden features with ease.
Planning Your Garden Lighting Layout
Okay, so you've decided to add some low-voltage lights to your garden. That's awesome! But before you start buying stuff, we really need to think about where everything's going to go. It's not just about sticking lights in the ground; it's about creating a whole mood, you know? A good plan makes all the difference.
Mapping Out Your Lighting Design
First things first, grab a piece of paper and sketch out your garden. Seriously, draw it all: the big trees, the flower beds, the paths, the patio, any little sheds or benches. Don't worry about making it look like a masterpiece; just get the main stuff down. Now, think about what you actually want to see when it's dark. Are you trying to make your favorite rose bush pop? Or maybe you just want to make sure nobody trips on the steps after sunset? Identifying these key spots is the first step to a successful lighting plan. You'll want to mark where you think lights should go on your sketch. This drawing will be super helpful later when you're figuring out how many lights you need and what kind of cables to buy. It helps avoid those "oops, I need another 10 feet of wire" moments.
Balancing Light and Shadow
This is where it gets interesting. You don't want your whole yard to look like a brightly lit football field. That's just harsh and kind of creepy. The trick is to use light and shadow together. Think about creating little pockets of light and areas of soft darkness. This makes the garden feel more mysterious and inviting. You can use different types of lights for this. For instance, a path light might give you a steady glow to guide your way, while a spotlight aimed at a tree can create dramatic shadows. It's all about creating visual interest. You want enough light to feel safe and see where you're going, but not so much that you lose all the natural charm of your garden at night.
Layering Light for Depth
Layering is like adding different textures to a room, but with light. It gives your garden a sense of depth and makes it feel more alive. Most pros talk about three layers:
- Ambient Lighting: This is the general, soft light that sets the overall mood. Think of lights along a fence line or subtle uplighting on a wall.
- Task Lighting: This is for practical stuff. Lights along your walkways, steps, or maybe near a seating area where you might read.
- Accent Lighting: This is the star of the show. Using spotlights to highlight a special tree, a sculpture, or a water feature.
By combining these layers, you create a much more dynamic and interesting outdoor space. It stops everything from looking flat and one-dimensional. You can even use smart systems to control your landscape lighting remotely or set automated schedules. This is great for convenience and energy efficiency.
When you're planning, remember that plants grow! The spot you pick for a light today might be completely covered by leaves in a few months. Try to place fixtures with the mature size of the plants in mind, or choose lights with adjustable heads so you can redirect the beam as needed.
Selecting the Right Low Voltage Fixtures
Picking out the right lights for your garden can feel a bit overwhelming, but it's actually pretty straightforward once you know what you're looking for. It's all about matching the fixture to its job. Think of it like having the right tool for every task in your yard.
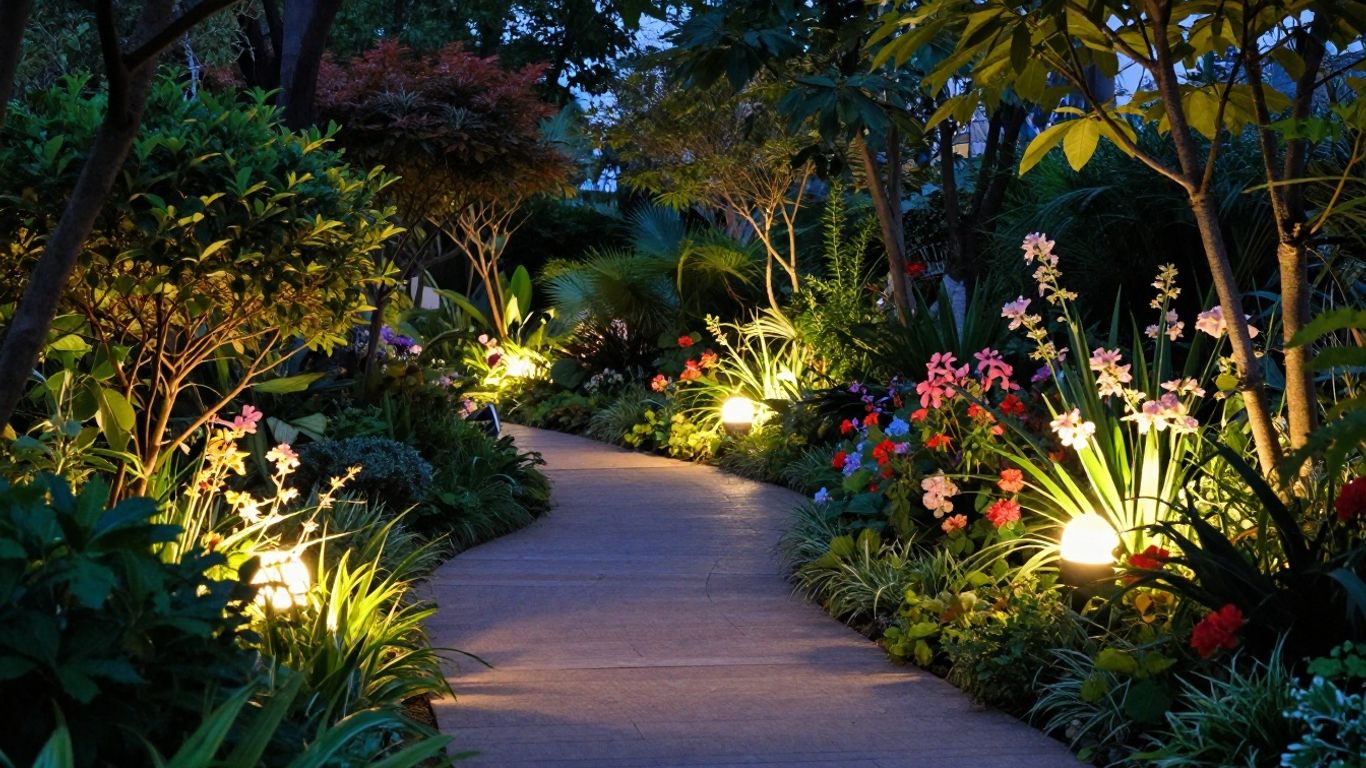
Path Lights for Safe Navigation
These are probably the most common lights you'll see. Path lights are designed to cast a gentle glow downwards, right onto your walkways, garden paths, or driveways. This makes them super helpful for safely guiding people around your property after dark. They usually have a sort of "hat" or shroud that directs the light where you need it, stopping it from shining up into your eyes. When you're picking them out, look for sturdy materials like powder-coated aluminum or brass. They'll hold up better against the weather. For a cozy feel, aim for lights with a warm white color, usually around 2700K to 3000K on the Kelvin scale.
Uplighting for Dramatic Accents
Uplights and spotlights are your go-to for creating a bit of drama. They shoot a focused beam of light upwards, perfect for highlighting specific features. Think about pointing them at a beautiful tree trunk, a textured garden wall, or even a cool statue. Placing them a few feet away from the object and angling them up can create really striking shadows and emphasize the form. If you've got a mature tree, lighting it from a couple of different angles can really show off its structure and add a lot of depth to your garden.
Spotlights for Architectural Features
Similar to uplights, spotlights are great for drawing attention to the architectural details of your home or garden structures. You can use them to highlight columns, interesting brickwork, or even a unique garden gate. Their focused beam allows you to pinpoint exactly what you want to showcase. Remember, the goal here is to add visual interest and make those special features pop, even at night. You can find some really neat low-voltage path lights that can also double as spotlights for smaller features.
Deck and Step Lighting for Safety
These little lights are often overlooked, but they're incredibly important for safety. Deck and step lights are usually smaller and designed to be mounted flush with surfaces or recessed. They provide just enough light to make sure no one trips on stairs, steps, or changes in elevation on your patio or deck. They give off a soft illumination without being too bright or taking up much visual space. It's a simple way to make your outdoor living areas much more usable and secure after the sun goes down.
Choosing the right fixture isn't just about looks; it's about function. Each type of light has a specific job, whether it's guiding your steps, highlighting a favorite plant, or adding a bit of sparkle to your deck. Getting this right makes a huge difference in how your garden feels at night.
Here's a quick rundown of common fixture types and their best uses:
- Path Lights: For walkways and garden edges. Direct light downwards.
- Uplights/Spotlights: To highlight trees, statues, or architectural details. Focused beam.
- Flood Lights: For washing larger areas like walls or fences with light. Wider beam angle.
- Deck & Step Lights: For safety on stairs and level changes. Low profile.
- Well Lights: Installed in the ground, ideal for illuminating trees without visible fixtures.
Essential Components for Your System
So, you've got your garden layout planned and you're ready to pick out the lights. But before you get too excited about all the pretty fixtures, let's talk about the nuts and bolts – the stuff that actually makes the magic happen. Getting these parts right is super important if you want your lights to work well and last a long time. It’s not just about the bulbs and the housings; it’s about the power behind it all.
Choosing the Correct Transformer
Think of the transformer as the heart of your whole lighting setup. It takes the regular power from your house and steps it down to the safe, low voltage that your garden lights need. Picking the right one is key. You don't want one that's too small, or your lights will be dim, especially the ones furthest away. A good rule of thumb is to add up the wattage of all the lights you plan to use and then add about 25% more. This gives you some wiggle room and makes sure everything runs smoothly. Many transformers also have different voltage taps, like 12V and 15V. Using the higher voltage tap for longer cable runs can help keep the brightness consistent.
Here’s a quick look at transformer sizing:
| Fixture Wattage | Total Wattage | Recommended Transformer Size (Min.) |
|---|---|---|
| 5W (x10) | 50W | 75W |
| 7W (x15) | 105W | 150W |
| 10W (x20) | 200W | 300W |
Selecting Appropriate Low Voltage Cable
This is the "veins" of your system, carrying the power from the transformer to each light. You'll want to use a heavy-duty cable, usually labeled as 12-gauge or 14-gauge. The 12-gauge is thicker and better for longer runs because it reduces "voltage drop" – that's when the power gets weaker the further it travels. You want to make sure the cable is rated for direct burial, meaning it can handle being in the ground without needing extra protection like conduit. This stuff is built to last, resisting moisture and soil acidity for years.
Understanding Cable Connectors
Connecting your lights to the main cable needs to be done right. You don't want water getting into these connections, or you'll have problems down the line. There are a few types of connectors available. Some are simple push-together types that are pretty easy to use. Others involve splicing the wires and using special waterproof connectors, often filled with gel or using heat shrink. Whatever type you choose, make sure it's designed for outdoor, low-voltage landscape lighting. A good, secure connection here means fewer headaches later on.
Getting these core components right from the start is like building a solid foundation for your house. It might not be the most exciting part, but it makes all the difference in how well your garden lights perform and how long they stick around, looking great.
When you're picking out your cable and connectors, think about the long haul. You're investing in making your garden look beautiful at night, and these parts are what keep that dream alive, shining bright.
Installing Your Low Voltage Garden Lights
So, you've picked out your fixtures, figured out where they're going, and you've got all the bits and pieces ready. Now comes the fun part: actually putting it all together. Don't let the idea of "electrical work" scare you off. Low voltage systems are designed to be pretty straightforward, making it a totally doable DIY project for most folks. It's all about taking it step-by-step and being a little careful.
DIY Installation Steps
Getting your lights up and running involves a few key stages. It's not rocket science, but paying attention to the details makes a big difference. Here’s a breakdown of what you'll be doing:
- Lay Out Your Cable: Start by unrolling the low voltage cable. Run it along the path where you've planned your lights. It's a good idea to leave a little extra cable, just in case you need to adjust things later. If you want a really clean look, you can bury the cable a few inches down along garden beds or pathways. Using cable staples or U-shaped stakes can help keep it neat and tidy. When you're going around corners, try not to make any sharp bends, as this can damage the wire over time.
- Connect Your Fixtures: Now it's time to hook up the lights. Most systems come with connectors that are pretty simple to use. You'll typically clamp these onto the low voltage cable. Some are even tool-free, which is a nice bonus. Once a light is connected, it's a good idea to turn on the transformer briefly to make sure it powers up before you move on to the next one. This way, you catch any issues early.
- Position and Adjust: After connecting, take a moment to position each light fixture exactly where you want it. For spotlights, you might want to angle them slightly up to catch a tree or a nice bit of garden architecture, but be mindful not to create glare for anyone sitting nearby. Path lights should be aimed to illuminate the walkway clearly.
- Final Touches and Testing: Once all the lights are connected and positioned, you'll want to tidy up any exposed cable by covering it with mulch, dirt, or edging. Do a final check of all your connections to make sure they're snug and weatherproof. A quick walk-through at night is the best way to see how everything looks and if any adjustments are needed. If a light isn't working, the most common culprit is a loose connection, so double-check those first.
Ensuring Safe Connections
Safety is always the top priority, even with low voltage. Because the voltage is so much lower than standard household current, the risk of electric shock is greatly reduced, which is why it's so DIY-friendly. However, there are still a few things to keep in mind to make sure everything is safe and sound.
- GFCI Outlet: Always plug your transformer into a Ground Fault Circuit Interrupter (GFCI) protected outlet. This is a standard safety feature for outdoor electrical connections and provides an extra layer of protection.
- Waterproof Connectors: Use the connectors that come with your kit, or purchase ones specifically designed for outdoor, low voltage lighting. These are built to keep moisture out, which is key to preventing corrosion and short circuits.
- Mark Utilities: Before you start digging or burying any cables, it's a good practice to call your local utility locating service. They can mark underground lines, preventing accidental damage to gas, water, or other utility services. This is a free service in most areas.
Working with low voltage systems significantly lowers the risk compared to standard household wiring, but it's still electricity. Taking simple precautions like using GFCI outlets and waterproof connectors goes a long way in ensuring a safe and reliable setup for your garden lighting.
Testing Your New System
Before you can truly relax and enjoy your illuminated garden, a thorough test run is in order. This is your chance to catch any glitches and confirm that everything is working as planned. Once you've made all your connections and secured your fixtures, it's time to power up.
- Initial Power-Up: Turn on the transformer. Listen for any unusual sounds and check if all the lights you've installed are illuminated. If you're using a timer or photocell, make sure it's set up correctly to activate the lights when you want them to.
- Nighttime Walk-Through: The real test happens after dark. Take a stroll through your garden and observe the lighting. Are the paths clearly lit? Are the accent lights creating the desired mood? This is the best time to notice any spots that might be too dark or too bright, or if any fixtures need repositioning. You might find that a slight adjustment to a spotlight or path light makes a big difference in the overall effect.
- Troubleshooting: If a light isn't working, don't panic. The most common issue is a loose connection at the fixture or along the cable. Double-check all the connectors you've made. If you're still having trouble, retrace your steps and ensure the cable is properly seated in each connector. Sometimes, a faulty bulb or fixture can be the cause, but connections are usually the first thing to inspect. For more complex issues, consulting the manufacturer's guide or looking into outdoor lighting installation tips can be helpful.
Enhancing Your Garden with Creative Lighting Techniques
Once you've got the basics down, it's time to get a little more creative with how you light up your garden. It's not just about seeing where you're going; it's about creating a mood, adding drama, and making your outdoor space feel magical after the sun goes down.
Moonlighting for a Natural Glow
This technique is all about mimicking natural moonlight. You mount lights high up in trees, kind of like where the moon would be, and angle them downwards. The idea is to get a soft, diffused light that washes over your garden. It creates these really cool, natural-looking shadows that shift when the wind blows the leaves. It’s perfect for creating a peaceful vibe in a seating area or over a garden path. It makes the whole garden feel more alive and organic.
String Lights for Festive Ambiance
String lights are fantastic for adding a touch of fun and festivity. Drape them over a patio, weave them through pergolas, or even string them between trees. You can find all sorts of styles, from classic Edison bulbs that give off a warm, vintage feel to tiny fairy lights that twinkle. They're great for parties or just making a cozy spot feel extra special. They really help define an outdoor living space and make it feel more inviting.
Underwater Lighting for Water Features
If you have a pond, fountain, or even a small water feature, adding lights beneath the surface can be stunning. Submersible lights can highlight the movement of the water and add a really magical quality. Cool white or blue lights often work best with water, making it look really natural and serene. It’s a simple way to add a big wow factor to your garden.
Here are a few more ideas to play with:
- Uplighting: Place lights at the base of trees or large shrubs and point them upwards. This makes their texture and height really stand out.
- Spotlighting: Use targeted lights to draw attention to specific features like a statue, a unique plant, or an interesting wall.
- Path Lighting: While practical, path lights can also be decorative, guiding guests with a soft glow.
Lighting your garden is like painting with light. You can create different moods and draw attention to your favorite spots. Don't be afraid to experiment and see what looks best in your unique space. Think about how the light interacts with the plants and structures throughout the night. DIY chandelier makeovers can inspire creative lighting ideas for your whole home, inside and out.
Maintaining Your Low Voltage Lighting System
So, you've got your garden looking all fancy with those low-voltage lights. That's awesome! But like anything, they need a little TLC to keep looking good and working right. It’s not a ton of work, honestly, but doing it regularly makes a big difference. Think of it like watering your plants – a little bit often keeps them healthy.
Regular Cleaning and Checks
First off, let's talk about keeping those lights clean. Dirt and grime can build up on the lenses, and it really cuts down on how bright they are. I noticed mine were looking a bit dim after a few months, and a quick wipe made them look brand new again. You don't need fancy cleaners; a soft cloth with some water and maybe a splash of vinegar works wonders. Do this every few months. Also, take a peek at the fixtures themselves. Sometimes, with the ground shifting or plants growing, they can get knocked out of place. Just nudge them back where they need to be, pointing at the right spot. It’s also a good idea to trim back any branches that might be growing into the lights or blocking their beams. It’s amazing how fast plants grow!
Troubleshooting Common Issues
What if a light just… stops working? Don't panic! The most common culprit is a loose connection. Start by checking the connector closest to the light that's out. Sometimes they just wiggle loose. If a whole section of lights goes dark, it could be a bigger issue. Check if you've overloaded your transformer – that's a big no-no. Always make sure you're not running your transformer at its absolute maximum capacity. Leave some breathing room, maybe aim for 80% max. Another thing to watch for is voltage drop, which makes lights at the end of a long wire run look dim. Using thicker gauge wire, like 12-gauge, can help fix this. If you're having persistent problems, it might be time to look into splitting your system into different zones or checking your transformer's settings. It’s usually something fixable, though.
Extending the Lifespan of Your Lights
Want your lights to last for ages? A few simple habits go a long way. Make sure all your wire connections are waterproof. Moisture getting in is a fast track to corrosion and flickering lights. Use those silicone-filled connectors – they’re worth the small extra cost. Also, keep an eye on how deep your wires are buried. If they're too close to the surface, lawnmowers or even just walking around can damage them. Aim for at least six inches down. By taking these small steps, you’ll keep your garden looking magical for years to come, without a lot of fuss. It’s a pretty good return on investment when you think about it.
Wrapping Up Your Outdoor Lighting Project
So, that’s pretty much it. You’ve learned how low-voltage lights can make your garden look amazing after dark, and importantly, how to do it yourself without needing an electrician. It’s not as complicated as it sounds, right? Just remember to plan it out, pick the right bits, and hook them up safely. Your yard will look totally different, and you’ll actually be able to use it when the sun goes down. Plus, it’s way more energy-friendly than you might think. Go ahead, give it a try and make your outdoor space the best it can be.
Frequently Asked Questions
What makes low-voltage lights different from regular outdoor lights?
Regular outdoor lights use a lot of power, like your home's main electricity (120 volts). Low-voltage lights use much less power (12 or 24 volts). This is thanks to a special box called a transformer that lowers the electricity level. It makes them safer and uses less energy, kind of like how a phone charger lowers the power for your phone.
Is it hard to set up low-voltage garden lights myself?
Not usually! Low-voltage systems are designed to be easier for people to install themselves. The wires are safer to handle, and the connectors often just snap together. You won't typically need to hire an electrician, which can save you money.
How do I figure out where to put my lights?
Think about what you want to see and what needs to be lit up. Put path lights along walkways so you don't trip. Use uplights to make trees or cool features stand out. Lights on decks and steps are important for safety. It's good to have a mix of lights, not just one type, to make your yard look interesting.
What are the most important parts I need to buy?
You'll need a transformer to change the power, the lights themselves (like path lights or spotlights), and special low-voltage cable to connect everything. You'll also need connectors to join the wires and tools like wire strippers and a screwdriver.
Can I add more lights later if I want to?
Yes, you usually can! If your transformer has enough power capacity, you can connect more lights to the existing cable. It's like adding more outlets to a power strip – just make sure the strip can handle the extra devices.
How long do these low-voltage LED lights usually last?
Good quality LED lights for outdoor use can last a really long time, often between 10 to 15 years. If you keep them clean and check the wires now and then, they should keep shining bright for many years.


